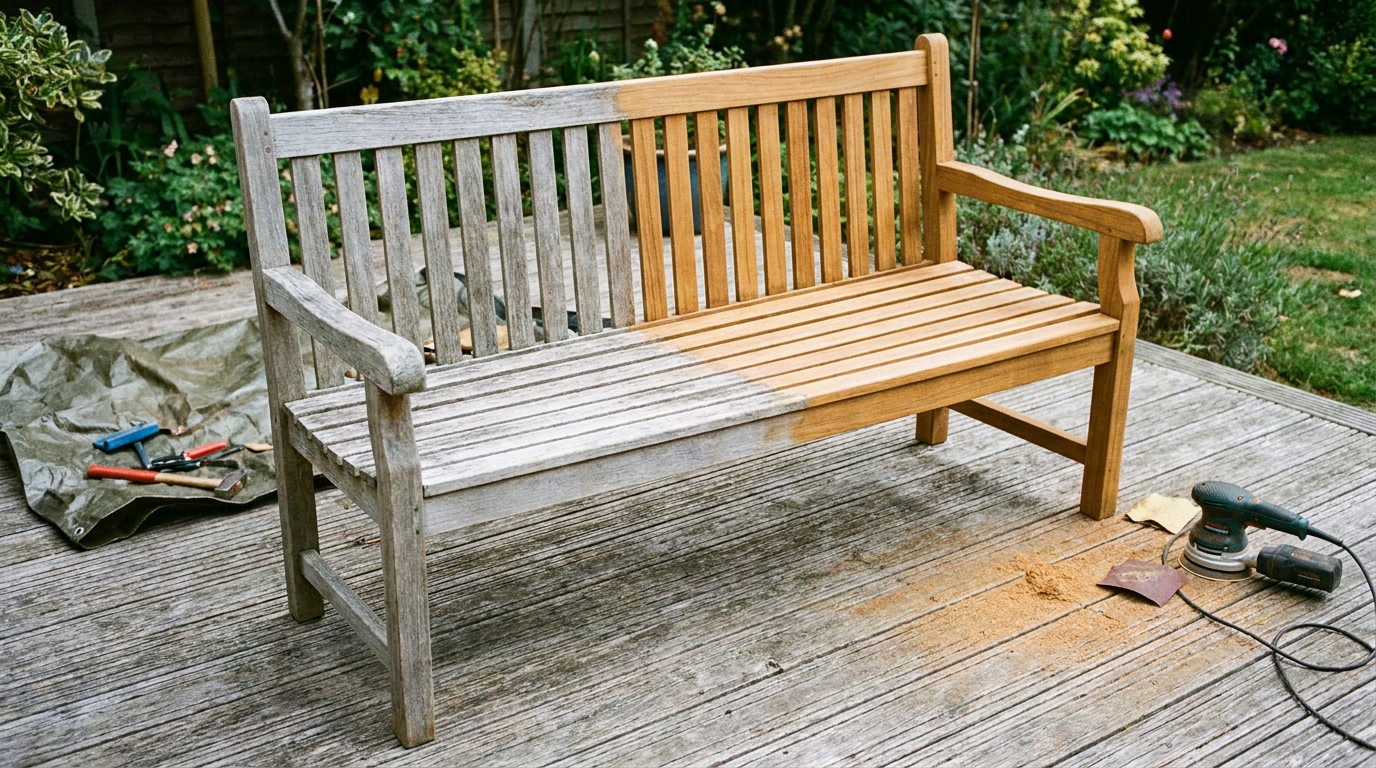
Outdoor teak bench mid-restoration, weathered grey on one side and restored golden on the other


Care & Maintenance · Teak Restoration

Restoring genuinely weathered teak is a 1–3 day project, not a quick clean. This guide walks through the assessment, the supplies, the execution, and the realistic outcomes for teak that's been neglected for years and needs more than the routine care covered in our Queensland teak care guide. Most online restoration content undersells how much work is involved or oversells the outcomes; this is the practical project guide for buyers tackling real restoration jobs. Part of our broader Queensland outdoor furniture care guide.

The A2Z Furniture Outdoor Team · 5 SEQ showrooms since 2013 · Reading time: ~9 min

Is this piece worth restoring? — the assessment framework

Before you spend a weekend and $80–$200 on supplies, work through the assessment. Some teak pieces are absolutely worth restoring; others have reached a point where the project will deliver disappointing results regardless of how carefully you execute. The honest assessment first.

Pieces that absolutely warrant restoration

  • Quality Grade A teak with structural integrity intact. If the joinery is solid, the slats are sound, and the timber feels firm everywhere, you're looking at cosmetic restoration — exactly what the project handles best. Quality teak rewards the work.
  • Pieces 5–15 years old that have been left untreated. Silvering and surface dirt, no rot, no joint failure. The most rewarding restoration scenario.
  • High-value pieces with sentimental or financial value. Heritage teak, designer pieces, or sets that would cost $3,000+ to replace. The project's worth absolutely shifts at higher replacement values.

Pieces where restoration is a coin-flip

  • Mid-range teak with some structural concerns. Slight joint movement, one or two cracked slats, but mostly sound. The work will succeed but you may want to repair structural issues before or during the cosmetic restoration.
  • 15–25 year old pieces. The timber's natural oils have depleted somewhat over time. Restoration works but the timber may need more sealer attention than younger pieces.
  • Lower-grade teak (Grade B or C) with sapwood content. Restoration is possible but the result won't have the uniform colour of Grade A teak — sapwood sections will look different from heartwood after sanding.

Pieces that aren't worth restoring

  • Structural rot or soft spots. Press your thumb firmly into the timber at any suspicious area — if it gives, the wood is compromised below the surface. Restoration won't fix this.
  • Joint failure that won't tighten. Loose mortise-and-tenon joints, bolts that no longer hold, splitting at stress points. Restoration treats appearance, not structure.
  • Extensive cracking that runs through joinery. Surface checking is normal and acceptable; cracks that compromise structural members aren't.
  • Budget teak veneer over softwood. Some lower-cost "teak" outdoor furniture is actually thin teak veneer over a softwood substrate. Once the veneer is compromised, sanding makes it worse.
  • Pieces from unknown grade where the wood feels unusually light. Genuine teak is dense; if the piece feels much lighter than expected, it may be a different timber entirely or low-quality teak that won't restore well.

The honest assessment: If the piece would cost less than $400 to replace and the structural condition is questionable, replacement usually delivers better outcomes than restoration. Quality teak under $400 is rare in Australia; if you're looking at a piece in that price range, it's likely a piece where restoration won't fully reverse the wear.

Supplies, time, and cost estimate

Restoration is genuinely cheaper than replacement on quality teak, but it's not cheap. The real total budget for a 6-piece teak dining set restoration runs $80–$200 in supplies plus 12–20 hours of work over 2–3 days.

Supplies list

For a typical 6-piece dining set or 4-piece lounge set, you'll need: a quality teak cleaner (water-based for moderate weathering, two-part solvent-based for severe weathering — $25–$60); 80-grit and 120-grit sandpaper for power sanding plus 220-grit for finishing ($20–$30); an orbital sander or sanding block (rent or buy — $40–$150 if buying); soft-bristle scrubbing brush ($10); rubber gloves and eye protection ($15); drop sheets or tarp to protect the work area ($15); a water-based UV-stabilised teak sealer if maintaining golden colour ($60–$120 for enough coverage); soft lint-free cloths for sealer application ($10); and an Allen key set for tightening any loose hardware mid-project ($15 if not already owned).

Time estimate

Most online tutorials wildly underestimate the time involved. Realistic time breakdown for a 6-piece dining set:

  • Assessment and preparation: 1 hour
  • Step 1 (deep clean): 2–3 hours active work, plus 24 hours drying
  • Step 2 (sanding): 4–8 hours active work depending on weathering severity and tool choice (orbital sander significantly faster than hand sanding)
  • Step 3 (sealing): 2–3 hours active work, plus 4+ hours between coats and 48 hours final cure
  • Total project: 12–20 hours active work spread across a long weekend with drying time built in

Lounge sets and bench seats take less; full dining sets with multiple chairs take more because each chair needs individual attention to slats, frames, and joinery.

Cost vs replacement

Quality 6-piece teak dining sets retail $1,500–$4,000+ in Australia. Restoration at $80–$200 plus your time delivers comparable visual outcomes on quality original pieces. The math overwhelmingly favours restoration on quality teak; the question is usually whether you have the time and patience for the work, not whether it's economically justified.

The project timeline — when to schedule in QLD

QLD weather makes the timing of restoration projects matter more than in temperate climates. Schedule wrong and the work can be ruined by humidity, rain, or extreme heat. The broader Queensland climate framework that drives this is covered in our complete outdoor furniture guide for Brisbane and Queensland.

The right window: October dry days

October is the ideal month for restoration projects in South East Queensland — dry weather is reliable, humidity is moderate, temperatures are warm but not extreme, and you have several weeks of clear days before storm season starts in November. Within October, choose a 3–4 day window with no rain forecast and humidity under 60% for the work itself, plus another 24–48 hours of clear weather for the final sealer cure.

Acceptable secondary windows

Late April through September works for restoration projects with appropriate weather monitoring. The post-wet-season (April–May) and dry-winter (June–September) periods have less reliable consecutive dry days than October but are workable with planning. Watch the forecast carefully — sealer applied within 24 hours of rain bonds poorly and may need reapplication.

Windows to avoid

November through March (wet season) is the wrong time for restoration projects. Humidity above 70% prevents proper drying between steps and compromises sealer cure. Storm-season afternoon thunderstorms ruin sealer application timing. The high temperatures also affect sealer cure quality on hotter days. If you've been planning a restoration project and storm season has arrived, postpone until April; rushing the work in poor conditions wastes the supplies and effort.

The two-day vs three-day project decision

For minimally-weathered teak (1–2 years untreated, mostly cosmetic), the project can fit into two days: clean and dry on day one, sand and seal on day two. For genuinely weathered teak (5+ years neglect, deep silvering, possible mildew), three days is more realistic: clean on day one, dry and sand on day two, seal on day three. Build in the days before committing to start.

Step 1: Deep clean

Cleaning isn't optional even if the piece looks reasonably clean already — surface dirt, organic matter, and any mildew need to come off before sanding, otherwise you grind contaminants into the timber surface.

Tarp the work area first

Lay drop sheets or a tarp under and around the furniture. Quality teak cleaners can stain pavers, concrete, and timber decking. The tarp also catches falling sanding debris in the next step. Wear rubber gloves and eye protection from this point forward.

Apply teak cleaner

For moderately weathered teak, a water-based teak cleaner is the right starting point. Pre-wet the timber with a garden hose at low pressure, apply the cleaner with a soft-bristle brush working with the grain, allow 3–5 minutes (or per manufacturer instructions), then scrub gently in the direction of the grain. Work in sections to keep the cleaner active on the surface; don't let it dry between application and scrubbing.

For severely weathered teak — the two-part cleaner

For teak that's been neglected for 5+ years with deep silvering, established mildew, or previous sealer/oil residue, a two-part solvent-based cleaner is more effective. Two-part cleaners use a stripping agent followed by a neutralising agent — read the specific product instructions carefully because the timing between parts matters. Two-part cleaners are more aggressive on the timber and on surrounding surfaces, so the tarp and PPE are essential.

Address any mildew

If the piece has black spots or mildew patches, the cleaning step is when to address them. The 1:10 bleach-water protocol covered in our teak care guide handles established mildew effectively. The general mould and mildew removal guide covers cross-material protocols if you're unsure what you're looking at.

Rinse thoroughly and dry

Multiple fresh-water rinses to remove all cleaner residue. Cleaner left on the timber will interfere with sealer adhesion later. After rinsing, allow the piece to dry completely — minimum 24 hours in October QLD weather, longer if humidity is higher than expected. Don't proceed to sanding until the timber is dry to the touch and feels stable.

Step 2: Sand to expose fresh timber

Sanding is where most restoration projects live or die. Done well, sanding reveals the golden timber underneath the silvered surface and produces a uniform finish. Done poorly, it leaves blotchy patches, gouges, or uneven colour that the sealer can't hide.

Start with 80-grit on heavily weathered surfaces

For deep silvering, start with 80-grit sandpaper (medium grit). Use an orbital sander for large flat surfaces; a sanding block for slats and edges; sandpaper folded around your hand for crevices and detailed areas. Work with the grain — never across or against it. The goal in this pass is to remove the silvered outer layer (typically 0.5–1mm of weathered timber) and expose the fresh timber underneath.

Move to 120-grit for the second pass

Once the silvered layer is removed and the underlying timber is visible, switch to 120-grit. This second pass evens out the surface, removes the deeper scratches from 80-grit, and prepares the timber for finishing. Work with the grain as before; the sanding action should feel smoother than the 80-grit pass.

Finish with 220-grit

The final pass with 220-grit produces the smooth surface that quality teak deserves. Work the entire surface lightly with the grain. The timber should feel smooth to the touch and look uniformly golden-brown after this pass.

Power sanding cautions

Orbital sanders save significant time but require care. Don't apply pressure — let the sander's weight do the work. Don't hold the sander in one place — keep it moving in steady passes with the grain. Don't use belt sanders on teak — they remove material too aggressively and can leave deep scratches that subsequent sanding can't hide. For complex shapes (chair backs, curved arms), hand sanding gives more control than power sanding.

Clean sanding dust before sealing

Sanding produces fine dust that settles in every crevice. Before applying sealer, wipe the entire piece down with a clean dry cloth, then a slightly damp cloth, then allow to dry completely (1–2 hours). Sanding dust trapped under sealer creates rough patches and bonds poorly.

Step 3: Seal (or accept the silver finish)

This is the decision point — apply sealer to maintain the golden colour, or skip sealer and let the timber re-silver naturally. Both are legitimate finishes for restored teak.

The sealer choice — water-based UV-stabilised only

For QLD conditions, only water-based UV-stabilised teak sealers are appropriate. Solvent-based products and traditional teak oils trap moisture and create the mildew problems covered in our Queensland teak care guide. Water-based sealers form a breathable barrier that allows the timber to release moisture while protecting against UV-driven re-silvering. This is the unambiguous QLD-correct choice.

Application technique

Apply with a soft lint-free cloth in thin even coats — heavy application looks worse than thin application and dries unevenly. Work with the grain, in sections, allowing each section to settle before moving to the next. Apply the first coat, allow 4+ hours drying time, then apply a second coat. Quality sealers benefit from a third coat on highly exposed surfaces (table tops, seat surfaces); save the third coat for these areas only.

The cure period

After the final coat, allow 48 hours of dry weather before exposing the piece to rain or heavy use. The sealer needs full cure time to bond properly; rain in the first 24 hours can leave water marks that don't disappear. Delay outdoor use until the cure is complete.

The skip-sealer option

If you've sanded back to fresh timber and decide you actually like the cleaner-than-silver look, you can stop here. The timber will silver again naturally over 6–18 months in full QLD sun, settling into a uniform silver patina that's significantly more attractive than the pre-restoration weathered state. This option produces excellent results with zero ongoing maintenance — the silvered finish doesn't need any treatment going forward, just routine cleaning. Our Queensland teak care guide covers the silver-vs-golden choice in detail; restoration with no sealer is the fresh-start version of the silver path.

Troubleshooting — when things don't go to plan

Real restoration projects encounter problems that step-by-step tutorials don't anticipate. The common issues and what to do about them:

Sanding reveals deeper damage than expected

If 80-grit sanding exposes cracks, soft spots, or rot underneath the silvered layer, you've discovered structural damage that wasn't visible in the assessment. Stop the cosmetic work and assess: minor cracks can be filled with timber filler before continuing; soft spots indicate structural compromise that may require replacing slats or returning the piece to the past-saving category. Don't continue sanding hoping the damage is shallow.

The timber looks blotchy after sanding

Uneven colour after sanding usually indicates one of three things: the original timber had sapwood content (lower-grade teak; the colour difference will remain after sealer); previous sealer or oil that wasn't fully removed in the cleaning step (re-clean and re-sand the affected area); or uneven sanding pressure (light additional sanding with 120-grit can even out the colour). The blotchy appearance often improves dramatically once sealer is applied.

The cleaner didn't lift the staining

Persistent dark stains after thorough cleaning indicate either established mould (use 1:10 bleach-water), sealer or oil residue from previous treatments (use a two-part cleaner if you started with water-based), or actual structural staining that's penetrated the timber (light sanding will remove it). Repeat the cleaning step before sanding rather than trying to sand through the stain.

Sealer is drying unevenly or looking patchy

This is almost always either too-heavy application or surface contamination. If the patchiness appears during application, you've applied too much — wipe off the excess immediately with a clean cloth and let the area dry before continuing with thinner coats. If the patchiness appears after drying, sanding dust or surface oils were probably not fully removed; light sanding and reapplication of that section fixes it.

Surface checking (small surface cracks) appeared during the project

Surface checking is normal on teak and isn't a project failure. Quality teak develops small surface cracks over its lifetime as the timber expands and contracts with humidity changes. Sealer fills these cracks and the appearance evens out. If the cracks are deep enough to feel with your fingernail, they're more than surface checking and may need filler before sealing.

The piece looks worse than it did before starting

This usually means you're partway through the project — particularly common after sanding but before sealing, when the timber looks raw and exposed. Push through to the sealer step before evaluating; the final appearance is dramatically different from the post-sanding appearance. If the piece still looks bad after sealing, reassess against the assessment framework — you may have started with a piece that wasn't worth restoring.

FAQs

  • How long does it take to restore weathered teak outdoor furniture?

    For a typical 6-piece teak dining set, plan 12–20 hours of active work spread across 2–3 days. Time breakdown: 1 hour assessment and preparation, 2–3 hours active cleaning plus 24 hours drying, 4–8 hours sanding (longer for severely weathered pieces), 2–3 hours sealer application plus 48 hours final cure. Lounge sets and bench seats take less; full dining sets with multiple chairs take more because each chair needs individual attention. Most online tutorials wildly underestimate the time involved, particularly the sanding phase. Build in realistic time before committing to start.

  • Can I restore teak that's been neglected for 5+ years?

    Yes, if the structural integrity is intact. Quality Grade A teak with sound joinery, firm slats, and no rot can be cosmetically restored even after 10+ years of neglect — the silvering and surface dirt come off, the underlying timber is generally fine. The honest assessment first: press your thumb firmly into the timber at any suspicious area to check for soft spots; check joints for movement; look for cracks running through structural members. If the piece passes the structural check, restoration delivers excellent results. If it doesn't, restoration treats appearance only and structural problems will persist. For severely weathered pieces, plan to use a two-part solvent-based cleaner rather than water-based, and 80-grit sandpaper for the first pass.

  • What sandpaper grit should I use to restore teak?

    Three-grit progression for restoration projects. Start with 80-grit (medium) on heavily weathered surfaces to remove the silvered outer layer and expose fresh timber underneath. Progress to 120-grit for the second pass to even out the surface and remove deeper scratches. Finish with 220-grit (fine) for the smooth final surface that quality teak deserves. Always work with the grain — never across or against it. For lightly weathered teak that's only been untreated 1–2 years, you can often skip the 80-grit and start with 120-grit. Avoid belt sanders entirely on teak; they remove material too aggressively. Orbital sanders work well for large flat surfaces; hand sanding gives better control on chair backs, curved arms, and detailed areas.

  • Do I need to use a teak cleaner or will soap and water work?

    For routine cleaning, soap and water with a soft-bristle brush works well. For restoration projects on weathered teak, a dedicated teak cleaner is significantly more effective — it's formulated to lift the silvered outer layer, established dirt, and any mildew that soap and water won't shift. Use water-based teak cleaners for moderately weathered teak (untreated for 1–4 years); use two-part solvent-based teak cleaners for severely weathered teak (5+ years neglect, deep silvering, established mildew, or previous oil/sealer residue). The cleaner step doesn't replace the sanding step in restoration projects — both are needed. The cleaner removes contaminants and mildew before sanding; sanding removes the weathered timber layer to reveal fresh wood underneath.

  • What's the best teak sealer for Queensland conditions?

    For QLD conditions, only water-based UV-stabilised teak sealers are appropriate. Water-based sealers form a breathable barrier that allows the timber to release moisture while protecting against UV-driven re-silvering. Avoid solvent-based products and traditional teak oils — they trap moisture against the timber surface and create the mildew problems that QLD humidity drives faster than drier climates. Apply sealer in thin even coats with a soft lint-free cloth, working with the grain in sections. Most quality sealers need 2 coats with 4+ hours between; highly exposed surfaces (table tops, seat surfaces) benefit from a third coat. Allow 48 hours dry weather for final cure before exposing the piece to rain or heavy use. Annual reapplication in October maintains the golden colour through the following year.

  • When should I schedule a teak restoration project?

    October is the ideal month for restoration projects in South East Queensland — dry weather is reliable, humidity is moderate, temperatures are warm but not extreme, and you have several weeks of clear days before storm season starts in November. Within October, choose a 3–4 day window with no rain forecast and humidity under 60%, plus another 24–48 hours of clear weather for the final sealer cure. Late April through September works as a secondary window with appropriate weather monitoring. Avoid November through March entirely — the wet season's high humidity prevents proper drying between steps and compromises sealer cure. If you've been planning a restoration project and storm season has arrived, postpone until April; rushing the work in poor conditions wastes the supplies and effort.

If restoration isn't worth it

If your assessment determined that the piece isn't worth restoring — structural rot, joint failure, budget teak that won't restore well — quality replacement teak is widely available. All five of our South East Queensland showrooms — Rocklea, North Ipswich, Sandgate, Bundall, and Beenleigh — carry quality teak outdoor pieces matched to QLD conditions, and our team can talk through the grade specifications, the silver-vs-golden patina decision, and the routine maintenance schedule that prevents your next teak set from ever needing a major restoration project. Free local delivery applies across Greater Brisbane and SEQ on eligible orders.

Leave a comment

All comments are moderated before being published